


| By: Paul S. Cilwa | Viewed: 7/26/2024 Occurred: 9/20/2023 |
Page Views: 538 | |
| Topics: #Programming #vb.net #ShadowLabel #CustomControls | |||
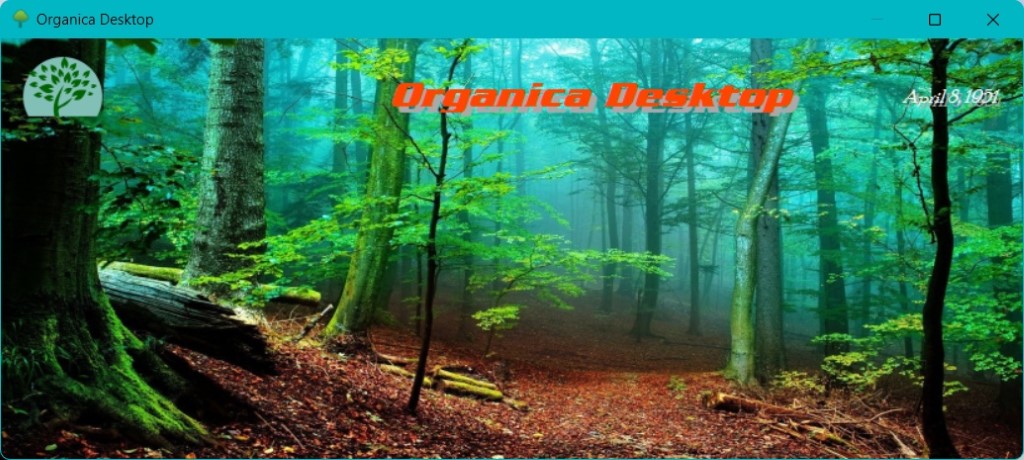
| A label control that casts its own shadow. | |||
I've always sought to create tools that enhance the user experience and bring my applications to life. That's why I've designed a derivative of a Label control that casts a shadow behind the text, specifically for Desktop applications. This control adds depth and visual interest to the text, making it pop against various backgrounds. It's an excellent choice for headers, or any content that needs to stand out. With this new control, I've found that I can effortlessly add a touch of sophistication to my applications, improving user engagement and overall aesthetics. Why settle for the ordinary when you can elevate your application with this shadow-casting Label control? I've made it part of OrganicaLib, but it's a pair of standalone .vb files so you have the option of simply plugging it into your program.
Creating a UserControl in VB.NET Core that's derived from the Label control involves several steps. Here's a basic outline of the process:
Create a new UserControl
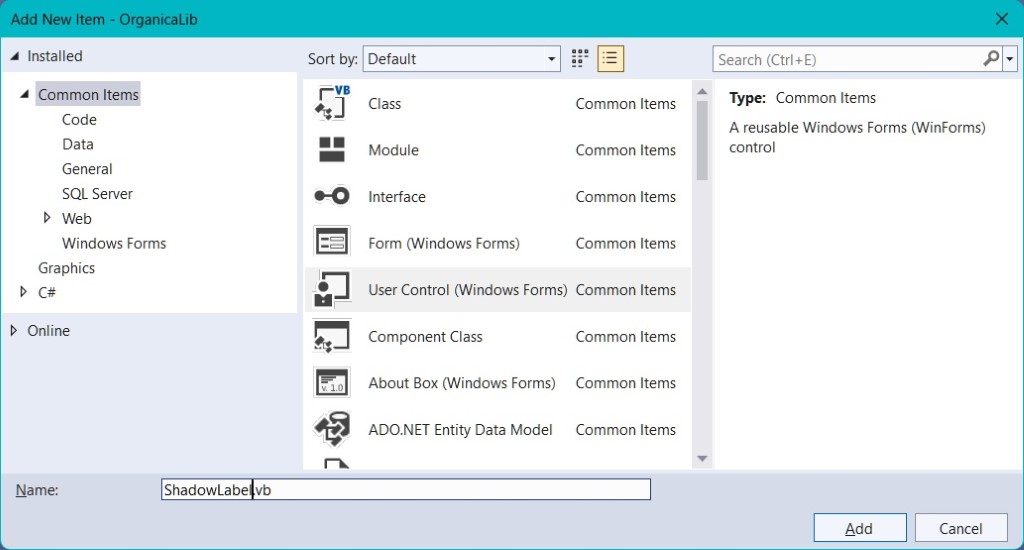
Start by creating a new UserControl in your project. This can be done by right-clicking on your project in the Solution Explorer, selecting Add -> New Item, and then choosing UserControl.
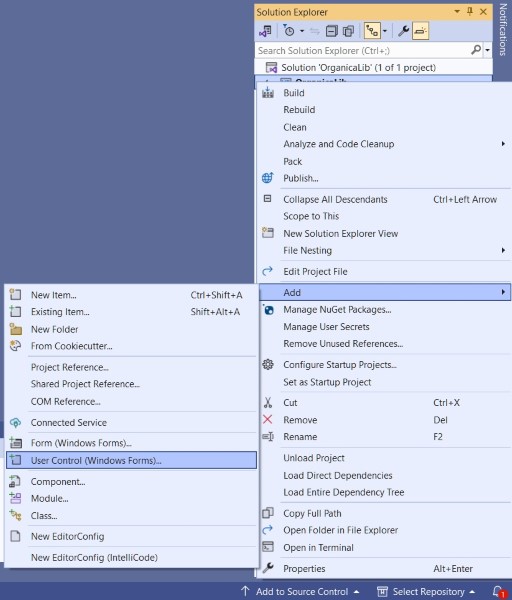
Name the UserControl
We're naming it ShadowLabel.
Find your new component files.
Don't be too surprised to find you've added two files to your project.
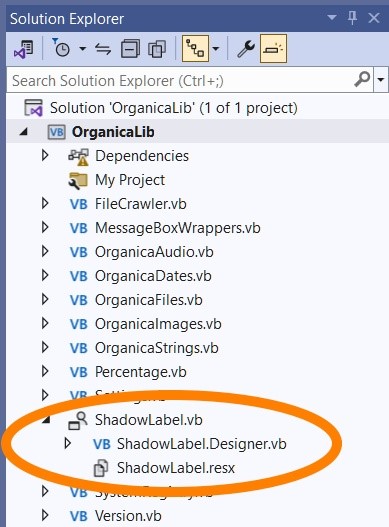
In VB.NET, a code-behind (designer) file is an additional class file that contains the code for a form or user control. This file typically has the .vb extension. The code-behind file includes event handlers, methods, and properties for the controls on the form or user control. The file is normally created and maintained by the Visual Studio environment. It makes use of the
Partialattribute to spread the design of the control across two files. That separates the Design mode aspects of the control from the programming parts of it.Inherit from Label Control
In the designer file for your new UserControl, you'll need to change the inheritance from UserControl to Label. This will make your new control behave like a Label control. Also, since I intend to override the Label control's
OnPaintevent handler, we need to set the Label control'sAutoSizeproperty toFalse.
ShadowLabel.vb
So now, we can open ShadowLabel.vb and find it is totally minimal. It'll compile, and will look and act like a normal Label control, but of course won't, as yet, have any unique characteristics:
Public Class ShadowLabel

End Class
Allow me to point out something interesting. Actually, two things:
It doesn't say
Partialon the class declaration, as it did in the designer file.It doesn't repeat the
Inheritsclause.
I point this out, not because it's a mistake—it's not!—but to rescue anyone so inclined to not overthink it.
The Partial keyword is needed in VB.NET when you want to split the definition of a class,
structure, or interface over two or more source files. However, the compiler allows at most one
partial declaration to omit the keyword; if two or more omit it, the compiler signals an error.
This is particularly useful in large projects where multiple programmers might be working on the same class simultaneously. It's also beneficial when working with automatically generated source code, like in Windows Forms, where you can add code to the class without having to recreate the source file.
So, in this case, even though the Partial keyword isn't present in the main file,
it's understood to be part of the partial class defined in the designer file. The compiler groups
all the various partial classes during compile time and treats them as a single entity.
I don't have a problem with that, but I do like to repeat the Inherits clause just
to remind me what I'm inheriting from. (If I accidentally get it wrong, that will trigger
an error.)
Plus,I'm gonna need an Imports statement anyway. So that gets us to this point:
Imports System.ComponentModel

Public Class ShadowLabel
    Inherits System.Windows.Forms.Label

End Class
Next we have to implement some properties. These actually duplicate some of the properties that would
have been inherited from Label; however, since we will have to override the OnPaint
function, we need to re-implement the properties that we'll be using in that function.
Properties
Property procedures in .NET are used to define the behavior of properties within a class. Properties provide a way to encapsulate the state of an object and allow controlled access to its attributes. In the ShadowLabel control, property procedures are used to define various properties related to text appearance and shadow effects.
A common naming convention for local variables associated with properties is to use an underscore prefix
followed by the property name. For example, _foreColor is the local variable associated with the
ForeColor property, and _shadowOffset is associated with the ShadowOffset property.
This convention helps distinguish between the local variable and the property itself, making the code more readable
and reducing naming conflicts.
Property procedures consist of two main parts: the property's getter and setter. The getter (Get accessor) retrieves the current value of the property, while the setter (Set accessor) allows you to assign a new value to the property. In the ShadowLabel control, when a property's value is set using the setter, the associated local variable is updated, and the control is invalidated to trigger a redraw with the updated property values.
For example, when the TextAlign property is set, the _textAlignment local variable is updated,
and the Invalidate method is called to ensure that the control is redrawn with the new text alignment.
This pattern is consistent throughout the control, allowing properties to be modified and reflected visually
in the control's appearance.
The <Browsable>, <Category>, and <Description> attributes
are used as metadata annotations in .NET to provide additional information about properties and fields,
especially when working with design-time tools like Visual Studio's Property Window. These attributes are known
as "custom attributes" or "attribute annotations."
So, with all that said, we can implement a few properties:
Public Class ShadowLabel
    Inherits System.Windows.Forms.Label

    Private _foreColor As Color = Color.White
    Private _shadowColor As Color = Color.DarkGray
    Private _shadowOffset As Integer = 3
    Private _textAlignment As ContentAlignment = ContentAlignment.MiddleCenter


    Public Overrides Property TextAlign As ContentAlignment
        Get
            Return _textAlignment
        End Get
        Set(ByVal value As ContentAlignment)
            _textAlignment = value
            Invalidate()
        End Set
    End Property


    Public Overloads Property ForeColor As Color
        Get
            Return _foreColor
        End Get
        Set(value As Color)
            _foreColor = value
            Me.Invalidate()
        End Set
    End Property


    Public Property ShadowColor As Color
        Get
            Return _shadowColor
        End Get
        Set(value As Color)
            _shadowColor = value
            Me.Invalidate()
        End Set
    End Property


    Public Property ShadowOffset As Integer
        Get
            Return _shadowOffset
        End Get
        Set(value As Integer)
            _shadowOffset = value
            Me.Invalidate()
        End Set
    End Property

End Class
ContentAlignment
A quirk in the DrawString, which we'll need in the OnPaint function,
is that it does not use the new standard of the ContentAlignment
types. A ContentAlignment combines vertical and horozontal alignments into a single value.
However, the DrawString is older, and uses separate values for vertical and horizontal
alignments. This means we need a couple of functions to split the horizontal and vertical alignments:
Public Class ShadowLabel
    .
    .
    .Private Function ContentAlignmentToStringAlignment(align As ContentAlignment) As StringAlignment
        Select Case align
            Case ContentAlignment.TopLeft, ContentAlignment.MiddleLeft, ContentAlignment.BottomLeft
                Return StringAlignment.Near
            Case ContentAlignment.TopCenter, ContentAlignment.MiddleCenter, ContentAlignment.BottomCenter
                Return StringAlignment.Center
            Case ContentAlignment.TopRight, ContentAlignment.MiddleRight, ContentAlignment.BottomRight
                Return StringAlignment.Far
            Case Else
                Return StringAlignment.Center
        End Select
    End Function

    Private Function ContentAlignmentToLineAlignment(align As ContentAlignment) As StringAlignment
        Select Case align
            Case ContentAlignment.TopLeft, ContentAlignment.TopCenter, ContentAlignment.TopRight
                Return StringAlignment.Near
            Case ContentAlignment.MiddleLeft, ContentAlignment.MiddleCenter, ContentAlignment.MiddleRight
                Return StringAlignment.Center
            Case ContentAlignment.BottomLeft, ContentAlignment.BottomCenter, ContentAlignment.BottomRight
                Return StringAlignment.Far
            Case Else
                Return StringAlignment.Center
        End Select
    End Function

End Class
OnPaint
So now we're finally ready to provide a replacement for the base class' OnPaint function.
Public Class ShadowLabel
    .
    .
    .
    Protected Overrides Sub OnPaint(e As PaintEventArgs)
        ' Create an image for the shadow text
        Dim shadowTextBitmap As New Bitmap(Width, Height)
        Using shadowTextGraphics As Graphics = Graphics.FromImage(shadowTextBitmap)
            ' Draw the shadow text with an offset
            Dim shadowRect As New Rectangle(_shadowOffset, _shadowOffset, Width, Height)
            Dim shadowTextFormat As New StringFormat()
            shadowTextFormat.Alignment = ContentAlignmentToStringAlignment(_textAlignment)
            shadowTextFormat.LineAlignment = ContentAlignmentToLineAlignment(_textAlignment)
            e.Graphics.DrawString(Text, Font, New SolidBrush(_shadowColor), shadowRect, shadowTextFormat)
        End Using

        ' Draw the main text
        Dim mainTextRect As New Rectangle(0, 0, Width, Height)
        Dim mainTextFormat As New StringFormat()
        mainTextFormat.Alignment = ContentAlignmentToStringAlignment(_textAlignment)
        mainTextFormat.LineAlignment = ContentAlignmentToLineAlignment(_textAlignment)
        e.Graphics.DrawString(Text, Font, New SolidBrush(ForeColor), mainTextRect, mainTextFormat)

    End Sub

End Class
The above code creates an image (
shadowTextBitmap) with the same dimensions as the control to render a shadow effect for the text.It then initializes a Graphics object (
shadowTextGraphics) to draw on theshadowTextBitmap.It calculates the position and size of the shadow text within the
shadowRectrectangle and sets its alignment based on the_textAlignmentproperty.It uses the
e.Graphics.DrawStringmethod to draw the shadowed text on theshadowTextBitmapusing the specified font, shadow color, and alignment.It then draws the main text within the control (
mainTextRect) using the same font, foreground color, and alignment settings as the shadow text, effectively overlaying the shadowed text with the main text.
At this point, you can drop the ShadowLabel files (don't forget the designer!) into your project. Once you've done a build, you'll find the ShadowLabel control at the top of your Toolbox. Drop it onto a form, adjust the properties as desired, and voila! You have a label that automatically displays a shadow behind the Text.